The SCU-17 actually presents to the operating system as two USB devices. The first device which on a Linux box will show up as /dev/ttyUSB0 is both an audio device which can be used to send and receive audio to the radio as well as to send CAT commands to the radio via the serial port. The second device which will show up as /dev/ttyUSB1 on a Linux box controls the PTT using the RTS and DTR lines.
FLDIGI is a popular sound card program. A challenge on Linux is to direct the audio from FLDIGI to and from the right audio device. Various audio interfaces have been employed over the years. PulseAudio is the current attempt at a device agnostic audio framework.
The pavucontrol program allows you to map the input and output devices that each application uses. This can be used to have FLDIGI use the SCU-17 while other audio (e.g. from your browser or system sounds) go the the computer speakers. This is important for your sanity as well as to prevent sending inappropriate sound from your computer on transmit.
sudo apt-get install fldigi pavucontrol
or use one of the package installation programs to install these packages.
Before plugging in the SCU-17 USB into your computer do ls /dev/ttyUSB*
If you see nothing, you have no other active USB devices in your machine. Now plug in the
SCU-17 USB into your computer, wait a few seconds and to the above ls command again.
You should see something like
/dev/ttyUSB0 /dev/ttyUSB1
Whichever new devices show up is the SCU-17. The lower numbered one
(/dev/ttyUSB0 here) will be the audio device and the higher numbered one
(/dev/ttyUSB1 here) will be the PTT device.
USB device numbers are assigned dynamically, so if you mess with what devices are attached to your computer, then this is going to be a moving target. You can use udevadm to assign permanent names to devices but that is not point and click and beyond the scope of this HOWTO.
Download the RigCAT XML file from SourceForge. You will probably want to move the downloaded file into the .fldigi directory in your home directory after you lanched FLDIGI.
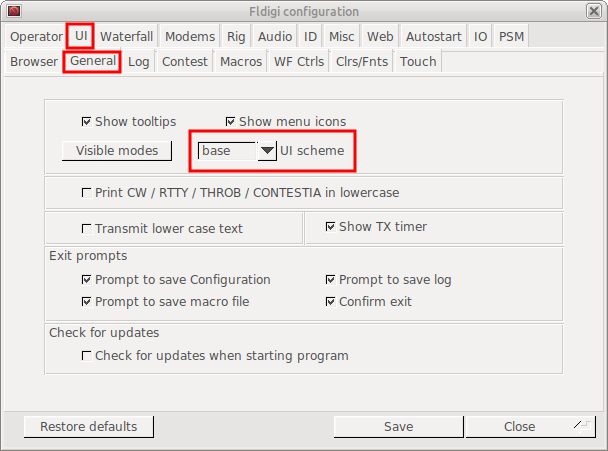
On some systems (e.g. Ubuntu Mate) the checkboxes on the configuration screens do not show up. Click on UI on the top row of tabs and General on the second row of tabs. Change the UI scheme selector until the check boxes work to your satisfaction. If the check boxes are there by default, you don't have to do anything.
Next configure the audio devices by clicking Audio on the top row of tabs and Devices on the next row of tabs. Select the PulseAudio checkbox. Leave the Server string blank.

I used RigCAT to control the radio. Hamlib did not work for me, so if you discover the magic to make hamlib work let me know.
Click the Rig tab on the top row of tabs and select RigCat on the second row of tabs. Click the Use RigCat checkbox and then click the Open selector on the Rig description file and select your radio. The dialog looks in the .fldigi directory in your home directory by default, so you may want to move the XML file you downloaded from SoureForge to that directory.
Next select the first USB device for the SCU-17. Set the baud rate to 38400 and one stop bit and make sure these values match the settings on your rig. On the FT-2000 the baud rate is menu item 28.
Click on the RTS/CTS (hardware) flow control. On the FT-2000 the CAT RTS is menu item 30, but set the CAT RTS to off even though it contradicts the setting in FLDIGI.
Then click Initialize

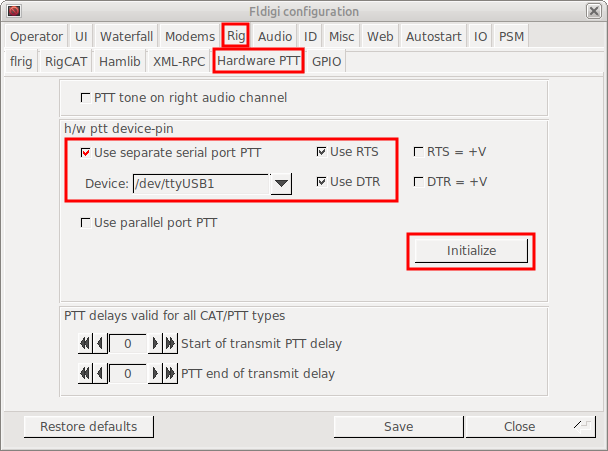
Finally, click the Rig tab on the top row of tabs and select Hardware PTT on the second row of tabs. Click the Use separate serial port PTT checkbox and set the second USB device associated with the SCU-17. The SCU-17 can use either RTS or DTR for PTT and FSK based on an internal switch in the SCU-17. Just turn both on here. Click Initialize to configure it.
At this point the waterfall display should be showing received audio and the frequency display should be tracking changes on your tuning dial. If not, try exiting FLDIGI and starting it again. If it still is not working, press on with the configuration - you may have too many audio devices and FLDIGI is still confused. We will fix that next.
With FLDIGI running, launch pavucontrol. On the Playback tab select the Show: Applications if it is not the default. The FLDIGI icon show be present. Set the Selector next to it to PCM2903V Audio CODEC Analog Stereo. This sends the audio out from FLDIGI to the USB device in the SCU-17. You can also launch other applications that produce audio (e.g. your browser). Make sure you send their audio somewhere else so that if you launch those apps while connected to the radio you do not send that audio to the SCU-17.

Next click on the Recording tab. Again select Show: Applications and then chnage the selector next to the FLDIGI icon to PCM2903V Audio CODEC Analog Stereo. If you have other programs that require other audio sources you can also configure them here.

At this point FLDIGI should be using the SCU-17 and only the FLDIGI audio should be going to the SCU-17. The pavicontrol device settings remain permanently, so you only have to do it once.